
Codex client configuration
The Codex client is OpenAI's desktop application. It can log in to ChatGPT directly, or use an API Key to run the local Codex workflow. Beginners often get confused: official account login, OpenAI API Key, and proxy Key are not the same thing.
First, distinguish between two login methods
This page only covers configurations in the desktop client related to Key, model, and Provider. Command-line installation, terminal commands, and more complete CLI usage are on the CLI Tools page.
| Method | Who it is suitable for | How to handle Key |
|---|---|---|
| ChatGPT Login | Already have ChatGPT Plus / Pro / Business / Enterprise accounts and want to use official Codex directly. | Follow the client login guide to log in; generally, there is no need to manually enter an API Key. |
| OpenAI API Key Login | Want to use OpenAI Platform account with pay-as-you-go, or local workflows require an API Key. | Use the Key generated in the OpenAI console, not the provider Key. |
| provider / Proxy Service | The provider gives their own API address, Key, and model name. | Do not randomly fill in the official API Key login box; usually, you need to configure a custom Provider through config.toml. |
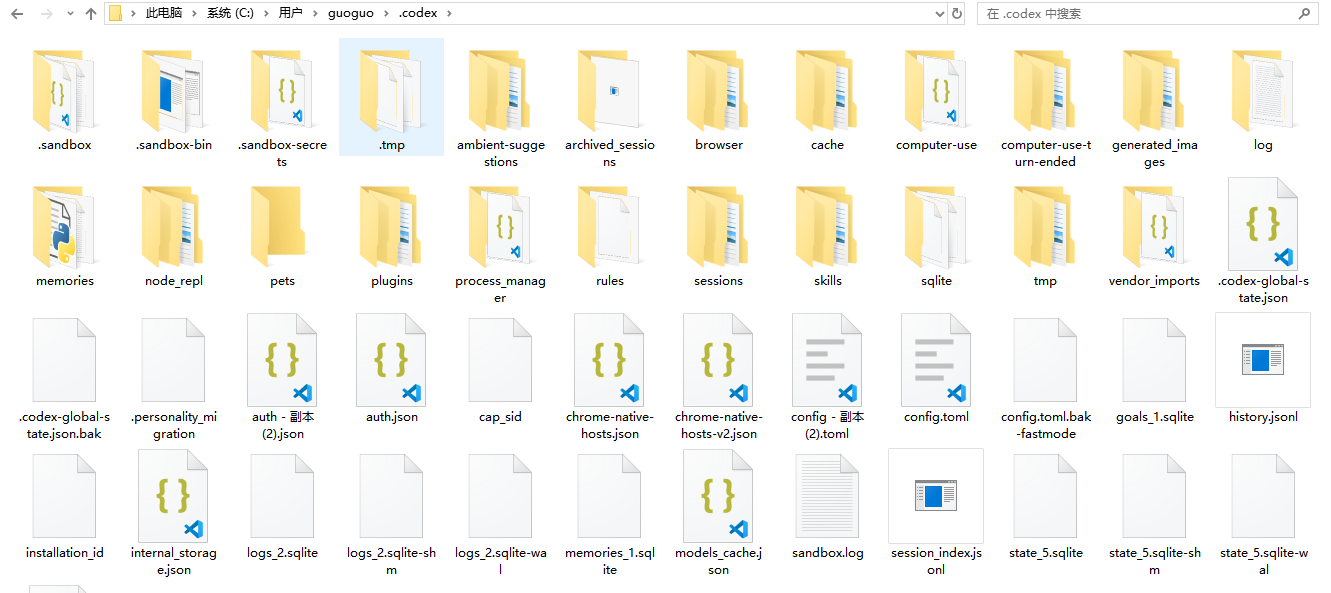
Example Path:C: \Users\YourUsername\. codex
How to configure Key
The local configuration directory of Codex is called . codex. For Windows clients, use %USERPROFILE%\. codex For macOS / Linux, usually use ~/. codex If you only log in with ChatGPT, do not manually write the Key for now; if you use a provider or a third-party provider Key, it is recommended to put the Key into the system environment variable, and then let config.toml read this variable.
| system | Configuration file | Where to put the Key |
|---|---|---|
| Windows | %USERPROFILE%\. codex\config.toml | User environment variables, for example MZ_PROXY_API_KEY. |
| macOS / Linux | ~/. codex/config.toml | Current terminal environment variables. After confirming it works, save it long-term according to your system habit. |
| WSL | ~/. codex/config.toml | WSL has its own home and will not automatically read Windows %USERPROFILE%\. codex. |
$env:MZ_PROXY_API_KEY = "YOUR_KEY"MZ_PROXY_API_KEY="YOUR_KEY" codex "Please reply only: Configuration successful"Do not write the real Key into web pages, screenshots, chat records, or project repositories. Use environment variables whenever possible instead of directly writing the Key into config.toml For long-term saving on Windows, you can add a user variable in the system "Environment Variables"; the method for long-term saving on macOS / Linux depends on the terminal you actually use.
How to configure the model
The default model is written at the top of config.toml Official documentation currently recommends starting from gpt-5.5 If you are using a provider, fill in the string in the provider's backend model list used for API calls. It might be called "Model ID, " "Model Name, " or "Model Name" in the backend. Copy exactly as is. Do not change upper/lower case, hyphens, or dots yourself.
model = "gpt-5.5"model = "MODEL_ID_FROM_PROVIDER_DASHBOARD" model_provider = "mz_proxy"| Setting | How to Fill | Common mistakes |
|---|---|---|
| model | Model ID / Model Name, which is the original identifier used for API calls in the backend model list. | Do not take the Chinese display name you created as the model identifier, or change uppercase/lowercase, hyphens, and dots yourself. |
| model_provider | Select the Provider ID defined below. | The Provider table was written, but it wasn't switched here. |
| openai_base_url | Only use it when you want to change the request URL of the built-in OpenAI Provider. | Mixing it with a custom Provider causes requests to go to the wrong place. |
| wire_api | Generally use responses. | It may not work properly when the provider does not support the Responses API. |
How to configure a provider Provider
The core of provider configuration consists of three things:Model Name, Base URL, Key environment variable If your provider offers an OpenAI-compatible interface, prioritize letting it support the Responses API; providers that only support the old Chat Completions will have worse future compatibility.
model = "MODEL_ID_FROM_PROVIDER_DASHBOARD" model_provider = "mz_proxy" [model_providers.mz_proxy] name = "Example AI Provider" base_url = "https://YOUR_PROVIDER_API_URL" env_key = "MZ_PROXY_API_KEY" wire_api = "responses"model = "gpt-5.5" model_provider = "openai" openai_base_url = "https://YOUR_OPENAI_PROXY_API_URL"openai_base_url.| Check items | Correct approach | Incorrect approach |
|---|---|---|
| Base URL | Copy the API address provided by the provider backend, whether it includes /v1 Refer to the provider’s instructions. | Using the homepage or console home page as the API address. |
| Key | Use an environment variable name, for example MZ_PROXY_API_KEY. | Directly write the Key into project files or send screenshots. |
| Provider ID | Create your own English ID, for example mz_proxy. | Use openai, ollama, lmstudio This type of reserved ID. |
| Model ID / Model Name | Copy the original identifier used for API calls from the backend model list. | Use your own display name, plan name, or a guessed name based on memory. |
First, check these in the client settings
After opening the Codex client settings, the left side will be grouped as 'Personal, Integration, Coding, Archived'. Beginners should start from Regular To start, mainly confirm the work mode, permission scope, default open location, terminal, and language; the model, Key, and Provider still return to the previous ones. config.toml Configuration part processing.
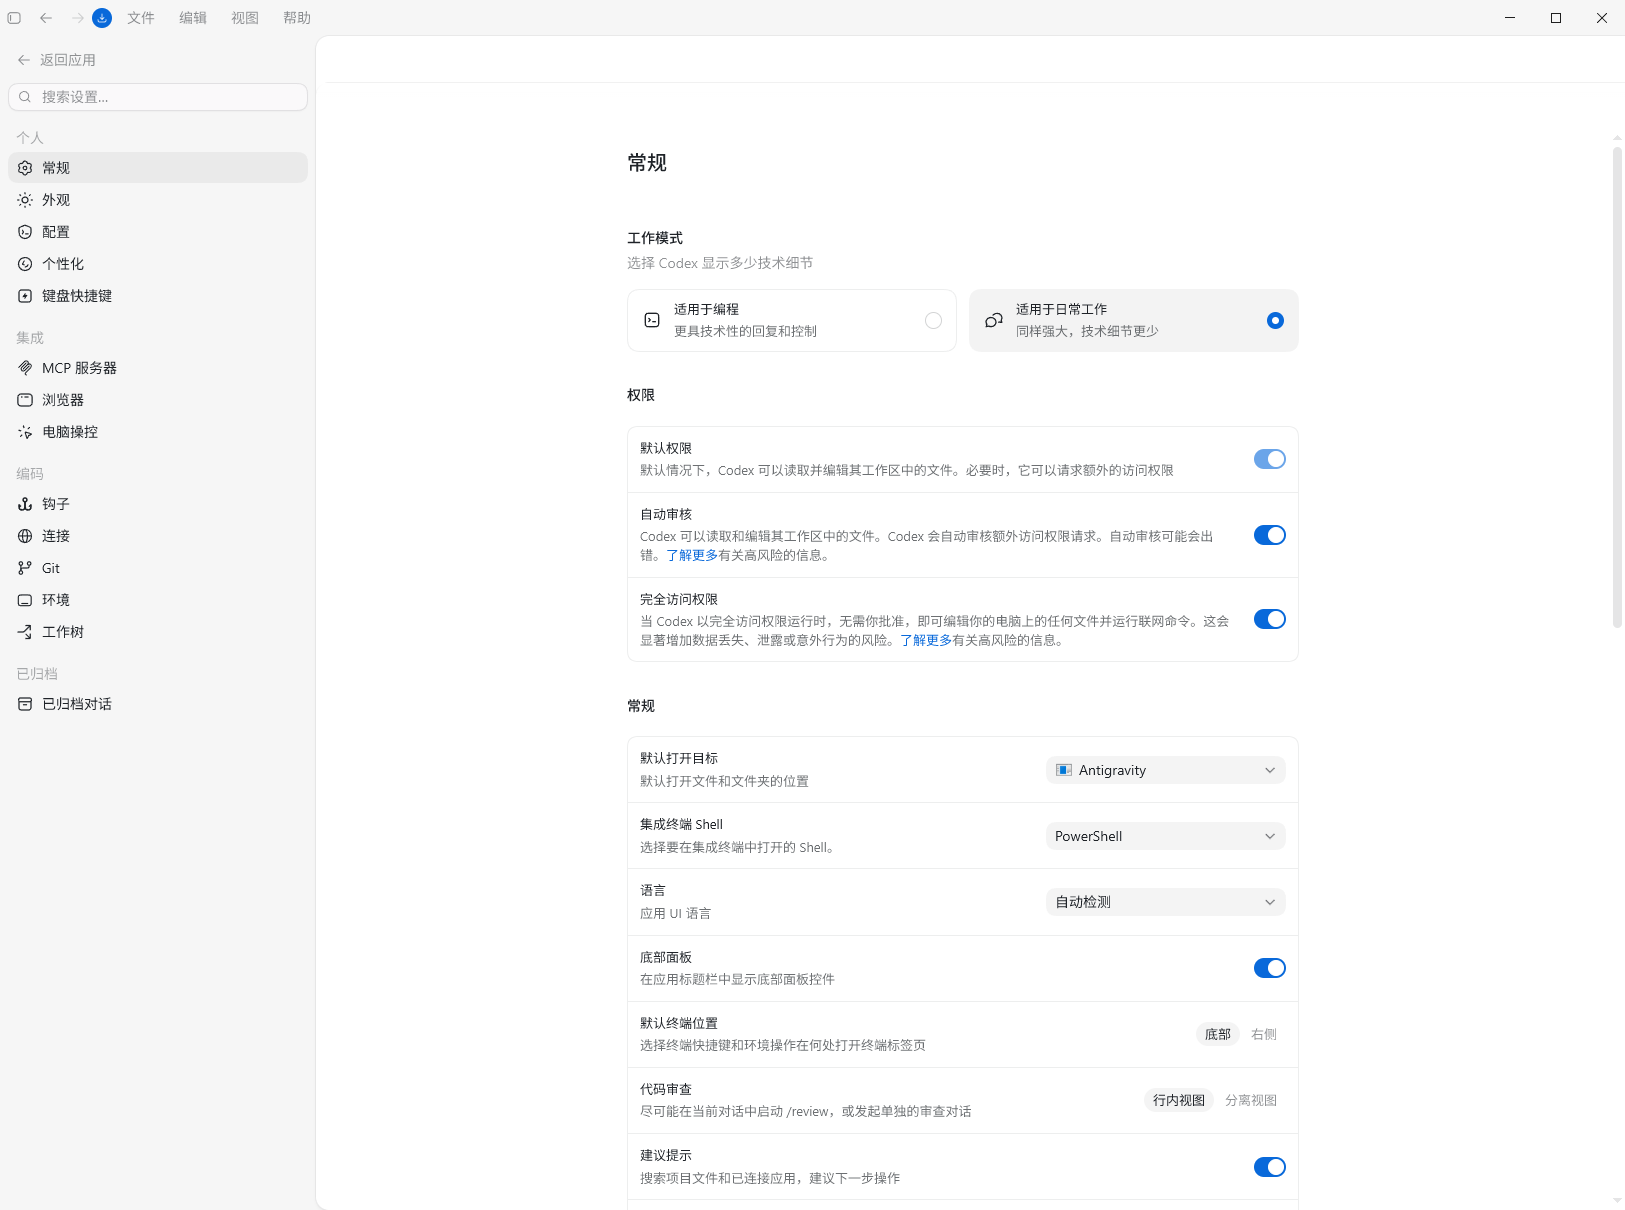
| Settings | What does it mean in the picture? | Tips for beginners |
|---|---|---|
| Work mode | Choose how much technical detail to show when replying with Codex.Suitable for programming It will be more focused on coding and control,Suitable for daily work Will reduce technical details. | Choose 'Applicable for programming' when configuring code or troubleshooting errors; choose 'Applicable for daily work' when just writing copy or organizing content. |
| Default permissions | Allow Codex to read and edit files in the current workspace; request additional permissions only when access to content outside the workspace is needed. | You can keep the default settings. Make sure to check where it wants to access before each authorization. |
| Automatic review | Codex can automatically determine some additional access requests, but the page also warns that automatic review may be wrong. | When beginners are unsure, they should turn it off first and change to confirm step by step themselves; after becoming familiar, turn it on as needed. |
| Full access | Allowing Codex to edit any files on the computer and run network commands without approval is obviously much riskier. | Do not turn it on by default. Only temporarily enable it when you clearly understand the consequences and the current task truly requires it. |
| Default open target | Decide which application the client uses by default to open files or folders. The screenshot shows Antigravity. | Choose the editor or workspace you usually use. If you're not sure, just keep the current value. |
| Integrated Terminal Shell | Decide which shell Codex uses in the integrated terminal, such as PowerShell, CMD, or Git Bash. | Windows beginners should prioritize using PowerShell, unless the tutorial specifically requires another terminal. |
| Language | Control the client interface language. The screenshot shows automatic detection. | If you want to keep the instructions in English, choose Chinese or automatic detection. |
| Bottom Panel / Default Terminal Location | Control whether the bottom panel is displayed, and whether terminal tabs appear by default at the bottom or on the right. | Choose according to screen size: laptops are usually placed at the bottom, widescreens can be placed on the right. |
| Code Review | Decide to initiate /review Is the review conducted in the current conversation, or is it split into a separate review conversation? | Beginners should first use 'inline view', where the context is more focused. |
| Suggestion Prompt | Based on the project files and connected applications, suggest what can be done next. | You can turn it on; if it feels disturbing, turn it off again. |
Verification and troubleshooting
After changing the Key, model, or Provider, restart the client and create a new test thread. For now, don't let it modify files; just let it confirm that the current project and model are working properly.
First state which files you can see. Do not modify files or run commands. Reply only with whether the current project is readable and the model ID or model name you are using.| Phenomenon | Common cause | How to handle |
|---|---|---|
| Prompt indicates no Key or authentication failure | The environment variable hasn't taken effect, or the client hasn't restarted yet. | Reopen the terminal/client; on Windows, check the environment variables in a new window. |
| Model Unavailable | The model ID / model name is incorrect, or the provider has not enabled this model. | Go back to the provider backend and copy the original identifier from the model list. |
| 404 / endpoint not found | The Base URL path is incorrect, common issues are /v1 Too many or too few. | Confirm the API address according to the provider documentation, don’t guess. |
| The request is going to the official OpenAI | The provider hasn’t switched to a custom ID, or used openai_base_url But this is not the scenario. | Check model_provider Whether it equals your Provider ID. |
| Works in WSL, but not in the Windows client | Windows and WSL use different . codex directories. | Make sure you are modifying the configuration file that the client actually reads. |
config.toml.Permissions and security
The Codex client can read project files, and may also modify files, perform checks, or open pages to view based on your confirmation. The most important thing for beginners is to clearly see what it wants to do before allowing it to proceed.
| Location | What to focus on | Tips for beginners |
|---|---|---|
| Approval prompts | Whether it wants to modify files, run checks, or access external services. | If you don’t understand, reject first and let Codex explain the reason in English. |
| File changes | Which files are added, deleted, or modified. | Before submitting, check each diff one by one, don’t just look at the summary. |
| Project scope | Which project on your computer this conversation is connected to. | Make sure it’s not an old project or a test project. |
| Where the changes go | Check whether it edits an isolated copy instead of touching your original project. | When risks are uncertain, prioritize using an isolated copy. |
| Browser Page View | Check if it is a local development page that is opened. | Manually verify when it involves account, payment, or backend permissions. |