
Open WebUI Configuration
Open WebUI is more like a web-based chat backend built by a team or individual. It is suitable for integrating multiple OpenAI-compatible services into the same webpage and can also be used with local models.
Official information Downloads and documentation are subject to the official site.
What scenarios is it suitable for
Web ChatTeam SharingLocal ModelsOpenAI Compatibility
First distinguish between personal direct connections and admin backend
| Entry Point | Who it is suitable for | How to determine |
|---|---|---|
| Personal Direct Connections | Regular users just want to configure a provider for themselves | In the settings page, you can see personal connections, Direct Connections, or similar entry points |
| Admin Panel - Connections | Admins want to configure providers for the entire site or team | Requires admin privileges; after saving, other users may see the corresponding model |
| Docker / Environment Variables | For those deploying Open WebUI themselves | Configuration is written in the startup command, compose file, or server environment variables |
How to fill in backend connections
| Configuration item | Filling Method |
|---|---|
| Entry Point | Admin Panel / Settings - Connections |
| Connection | OpenAI API / OpenAI Compatible |
| API Base URL | The full API address provided by the provider's backend may include /v1, or it may not. |
| API Key | Provider backend Key |
| Models | Sync list or manually specify |
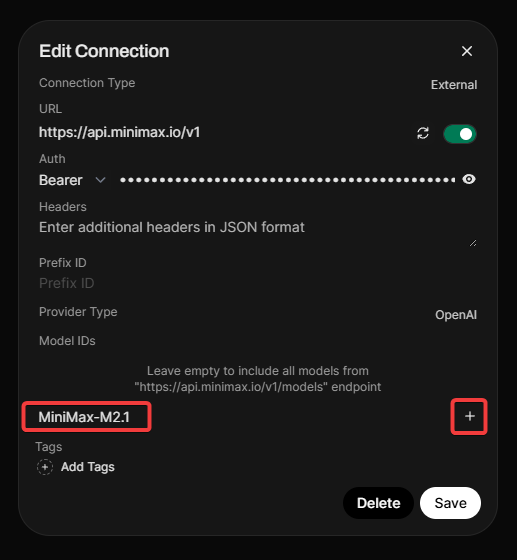
Reference for connections page This picture is used to compare the URL, authentication method, Provider Type, and model fields in the Open WebUI backend connections page.
- If you are just a regular user, first check if there is Direct Connections or a similar entry in your personal settings.
- If you are an admin, go to the Connections page in the Admin Panel.
- Add a new OpenAI compatible connection and fill in the Base URL and API Key.
- After saving, synchronize the model list; if synchronization fails, first manually enter a known model for testing.
- When the team shares usage, do not send personal keys directly to others; prioritize configuring them centrally in the backend.
How to test after saving
- First, create a normal chat; do not upload long documents or images first.
- Select the newly configured model in the model dropdown.
- Send 'Please only reply: Open WebUI configuration successful'.
- If the model list is empty, manually fill in a model ID/model name that is confirmed to be available in the provider's backend.
- If the administrator configuration in the backend is successful but ordinary users cannot see it, check user permissions, model visibility, and whether the connection is enabled.
Docker Environment Variable Example
If you are self-deploying, many configurations will be written in the startup commands or environment variables. The following is just an example; the actual address and key should be based on your provider's backend.
Open WebUI OpenAI Compatible Connection Example
OPENAI_API_BASE_URL=YOUR_PROVIDER_API_URL OPENAI_API_KEY=YOUR_API_KEY